Tuesday, July 30, 2013

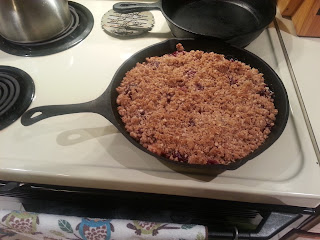
Soon-to-be-famous Cherry-Peach Crisp


Because it's that good. And I don't even LIKE cherries OR peaches! I mean, I don't hate them, but I don't love them either. *shrug* BUT...

Ok, back story. 'Cause if I don't love these two fruits, WHY did I make this dessert?

So My Fella's mom came by the other day with a gift:

Lookit! Seriously, don't you love those colors?!
And that's not all! There was corn on the cob, and string beans (which were promptly served up in Agent-S-fried-green-bean fashion), and asparagus, and banana bread, and an apple pie! My Fella says she over does it. I say all I need is an excuse to bake, so hush!

Anyway, for some reason, despite my indifference to both cherries and peaches, the idea of them combined appealed to me. So I called up Agent W and after some deliberation (mostly about which was a crisp vs. a crumb vs. a cobbler vs....), it was decided that I should make a cherry-peach crisp...because who wants to fuss with preparing a crust for a summer dessert?! Not I! But I didn't have such a recipe on hand (fascinating considering the amount of cookbooks, especially those devoted to desserts, that I own!). So we discussed it some more and decided on the basic ingredients it must have: sugar (both brown and white) and cinnamon and "toss together in a bowl. Taste. If it tastes good, top it and pop it in the oven." That's how we roll. I prepared this while making dinner at the same time, so I don't have as many pictures as I'd like...but I DID have the foresight to write down my recipe for future use:

This is, sadly, NOT the only recipe I have with no name, and only half the indredients

In my defense, I didn't know how it would turn out, so, ya know. In the end, I realized flour was missing in the early stages of our recipe. The question mark was my first "check-in time" and I'd add more if needed.

Using farm-fresh fruits requires some pretty messy work for this. You'll need to peel your peaches and pit your cherries. The easiest way to peel peaches is to cut an X across the bottom of each peach, immerse them in simmering water for about 30 seconds to a minute (you'll know it's been long enough when the skin starts to peel away from where you cut the X). From there, drop them immediately into ice water for about a minute to cool. Once cool, use a paring knife to lift the edges at the X and peel the skin away.

Here's where it gets messy...pitting cherries. Everyone's favorite, right? Well, like I said, I don't love cherries, so I do NOT have a pitting tool. So I Googled. And I found this at theKitchn. They suggest using a pastry tip. Oh, and I've most certainly got pastry tips! AAAAAAND IT WORKS! See?

Insert joke about the blood of the cherries being on my hands.
After all that was done, I did, in fact, toss it together in a bowl, taste it, top it
This is where I realized I hadn't taken a single picture. And the topping was already half on. Sorry, guys!
and pop it in the oven
Out of the oven and NOT marked with a B

So you know you want the recipe ;) Well, here it is:


Ingredients:


Filling:

4 peaches, peeled and sliced
1 pint of cherries, pitted
1/3 c. brown sugar
1/3 c. white sugar
1/4 c. flour
1/4 tsp. cinnamon

Topping:

1 c. brown sugar
1 c. flour
1 c. oats
1/2-1/4 tsp. salt, optional (I use salted butter, so omitted the salt from my topping)
1 stick butter, melted

Directions:

Preheat oven to 400 degrees F. In a large bowl, combine the dry ingredients for your filling. Add your fruit and stir gently until coated. Turn into casserole dish (or your favorite cast iron skillet). Set aside. Topping: While your butter is melting, combine dry ingredients. Pour melted butter over and mix until combined. Pour (or shake, really) topping evenly over fruit. Bake at 400 degrees for 20 minutes or until topping is browned and fruit is soft. Serve warm with whipped cream or vanilla ice cream. Or, ya know, both.


Agent W mentioned a dislike for oatmeal. Sigh. But I imagine this could be made with a crumb topping and still be just as good!

After you make this (because you really, REALLY should make this), let me know how it turned out!

Sunday, July 28, 2013

I-Don't-Care Curtains a.k.a. Patchwork Curtains


You lookin' at somethin'?!

*Warning: You know how I said my cats are incorrigible? You're about to learn why in this post*
So I've been moving along with The Girl's bedroom. She wanted mismatched textiles and mismatched-but-sorta-coordinating-because-I'm-anal textiles is what she'll get! I wish I could tell you that this is a tutorial. But then I'd be a liar. And nobody likes liars. And I want you to like me, because I like you! But anyway, a tutorial it is not! And that's because 1. I suck at math; my skills are embarrassingly poor, 2. I didn't really know what I was doing, and 3. every time I asked her opinion on anything about the curtains, she answered, "I don't care." Well, sh*t. Neither do I then. So I figured I'd just wing it!

I gathered some material and scraps I already had (I'll admit, hippies are the LEAST expensive decorators and I can totes get on board with that!), cut out some big square and rectangle shapes, and assembled them thus:


Hey. Hey, guys? I'm going to need those...
Ok, so I did use SOME measurements. I knew I wanted (needed?) a shade rather than traditional curtains for two reasons. Her room is on the second floor and, despite the central air, is UN-frickin-bearable, so she's got a window unit, too. So I needed curtains that wouldn't block the ac. SHE needed (wanted?) the curtains to block the sun in the morning. If I'd made panels, she'd need to close them at night, blocking the ac unit OR leave them open and risk the sun shining in. And we couldn't have THAT *eye roll* So I decided to make a single, tie-up curtain. That meant the finished curtain would need to be the same size as the window (67x37") so my raw measurements needed to be *somewhere* around 75x41" plus seam allowance for EACH square. That's when I was like, "WHY DID I TELL HER I'D MAKE THEM?!" To avoid having to do more math, especially considering the blocks were different shapes and sizes, I just overlapped them as I put my little curtain puzzle together to account for allowance, and continuously measured the overall length and width. I was just wingin' it all the way! Eventually, I needed to move to the floor because the table wasn't big enough. And lemme tell you how fun THAT was:

Ok, so that is kinda cute, but also a huge pain!

You're probably wondering what's going on in the picture above. Or you're a quilter and you know exactly what that is. That is smaller, odd-sized blocks sewn together to create larger, less odd-shaped blocks. Eventually, those larger blocks get sewn together to make the completed projected. I imagine this is an actual technique. But I'm NOT a quilter, so I don't know what it's called or if it even exists. It's just the only way I COULD sew some of it together if that makes any sense. Anyway, it ends up looking like this in the end:


I decided it wasn't gypsy-like enough and it needed something else. I ended up taking one of the sheer panels she already had hanging and cut two more rectangles from it. I attached beaded trim to each, hemmed the edges using a BAZILLION pins, and attached them to the curtain by ONLY sewing along the top edge. Now they flutter.

Lookit how the trims don't match each other! I had a breakthrough, yous guys!
I did line the curtain with some off white fabric I already had from another (although unfinished) project. There's probably a proper technique for that I ignored, too. I just hemmed the bottom of the lining, then sewed up the sides of the two pieces (right sides facing).

While admiring my handiwork, I saw this:

There was NO way I was ripping the seams out of four squares to fix that. So I improvised. I cut a square out of the peace sign fabric:


Ironed on some fusible web:


Cut the peace sign out with my trusty Xacto knife (while MAYBE pretending to be a surgeon) and scissors:


And ironed that bad boy right on there:


Will it last forever? Probably not. Will it do for now, until she decides to redecorate? Probably.

For the ties, I dug out an old scarf of mine with silver thread through it and tassels...and cut it up. This part hurt a little bit, actually. But in reality, I almost NEVER wear that scarf. 


So I took each strip, sewed it into tubes, and attached it to the top of the curtain at the same time I attached the rod pocket. I hung them just to be sure they fit, but not on the actual rod we'll use, or even inside the window as I intend for them to be mounted. But here's your peak at it before it's installed properly!

It MOVES!

So, they turned out fine, but I'll be honest, I'm not sure I'd attempt something like this again with the different sized blocks. Maybe there's an easier way (it probably involves math, though) that I'm unaware of. If there is, and you know it, PLEASE share it with me! I love the look, but won't do it again without instructions!

Saturday, July 27, 2013

Pantry Perils

The pantry. God, I'd love an honest-to-goodness pantry. Le sigh.

So you took the chicken out of the freezer to thaw, but that's as far as you got into planning dinner. And now it's five o'clock. Crap. Or maybe Benson and Stabler are at the door and you want to offer refreshments. What now? Well, if you have a well stocked pantry, you'll be all...

Pictured: swag
and less like...
Pictured: guilt

But what IS a well stocked pantry? Well, it's your kitchen staples...dry goods and the like. I made a list :) I love lists. So much. But anyway...

Absolute Must Haves:

These are items that are always, always, ALWAYS on hand at my house, regardless of time of year, how often I think I'll use it, etc., AND ALSO should be in everyone's pantries. In other words, STAPLES.

Dry Goods/Things that don't need refrigerating until AFTER they've been opened:
  • Baking powder
  • Baking soda (also awesome for cleaning!)
  • Barbeque sauce
  • Bread crumbs
  • Bouillon cubes (or canned broth, I suppose, but I prefer the cubes)
  • Canned vegetables 
  • Coffee (fo' sho'!)
  • Cornstarch
  • Flour
  • Garlic, bulb
  • Hot pepper sauce
  • Jelly (seriously, I ONLY buy grape. Nothing else should EVER go on a PB&J sandwich. But I gueeeesss you can buy whatever you want.)
  • Ketchup
  • Mayonnaise
  • Mustard ("deli" otherwise known as brown or spicy, plus whatever others you might use)
  • Oil (vegetable AND olive)
  • Pancake syrup
  • Pasta (a variety shapes and sizes--I keep about four pounds of "thin spaghetti" on hand at all times because that's what we eat most, plus a box each of elbow, penne, ziti, and lasagna. If you have a wee one, add pastine to the list)
  • Peanut butter
  • Popcorn kernels (it REALLY doesn't take much more effort than the microwave stuff)
  • Potatoes 
  • Quick sides (ya know, Betty Crocker and Lipton side dish type things. Especially au gratin potatoes)
  • Rice
  • Salad dressing(s)
  • Sugar (at LEAST granulated and brown, if not those and powdered/10x)
  • Tomatoes (crushed, paste, and sauce {NOT to be confused with spaghetti sauce})
  • Vinegar (balsamic and white -- buy the biggest bottle of white you can find and use it for cleaning and cooking!)
Spices (and herbs...but they all go in the SPICE rack. Jus' sayin'):
  • Basil
  • Bay leaves
  • Chili powder
  • Cinnamon
  • Cream of tartar
  • Cumin
  • Garlic powder (salt, too, if that's how you roll)
  • Marjoram, ground
  • Nutmeg, ground
  • Oregano
  • Paprika
  • Pepper (black, cayenne, crushed red flakes, white)
  • Poultry seasoning
  • Rosemary
  • Sage leaves
  • Salt (table and kosher)
  • Seasoned salt
  • Thyme
  • Vanilla extract
Fridge and Freezer:
  • Butter (buy extra, it can be frozen!)
  • Cheese (sandwich, Parmesan, cheddar) 
  • Eggs
  • Lemon juice
  • Milk
  • Produce, fresh or frozen (I'd list stuff, but really, we all have our favorites, so stock accordingly)
  • Dinner meats (ground beef, poultry, pork stuffs, etc)

Optional Items:

Items on this list are just useful (some are super useful) things you might want to add to the pantry, but may not be considered "staples" (in my opinion). Some I would consider staples...either to MY kitchen (my grandfather will tell you that Old Bay is a staple. I, however, have NEVER used it), or I only keep stocked seasonally. Things marked with + I do consider staples for my own kitchen. Things marked with * I buy seasonally. Things not marked, I don't buy at all, but YOU might want stock.


  • Allspice
  • Beans (especially chili)*
  • Biscuit mix
  • Canned pumpkin*
  • Chocolate (chips in all types of flavors and sizes, baking squares, powder)+
  • Chocolate syrup
  • Cornmeal+
  • Craisins*
  • Crisco+
  • Evaporated milk*
  • Fruit, lunchbox packaging*
  • Gelatin+
  • Heavy cream*
  • Honey
  • Microwave popcorn
  • Molasses*
  • Nonstick cooking spray (I preseasoned my cast iron then used the hell out of it! No use for nonstick spray here :D)
  • Oats (quick-cooking and rolled)+
  • Roasted red peppers+
  • Salsa+
  • Spaghetti sauce
  • Sour mix (for the margaritas, ya know)+
  • Tortilla chips+
  • Tortilla shells+

    Did I forget something? Comment and let me know!

    Friday, July 26, 2013

    To the Hippiemobile! Wait. What?

    Why can't we be friends?

    Confession: The Girl is a long-haired, dirty hippie. True story. We're democrats in this family, but she's hardcore. She's got that idealism that hasn't been touched by cynicism getting old age, yet. Good for her! But evidently, I've got to decorate her room around her hippienessism. Greeeeaaat. She requested curtains that actually keep the sun out (because God forbid she rise before noon) and a chandelier. Heh? She meant mobile, but I got'er. That's easy, so we trotted off to the Dollar Tree to purchase some flowers (daisies, actually. A hippie's favorite flower and wouldn't ya know, HER favorite flower. Go figure.) and she mentioned a love of butterflies. Also, easy enough. I'll just make some out of scrapbook paper, right? Oh! But WHAT IF...I make it more complicated than it needs to be and I make TIE-DYED BUTTERFLIES??!!! Yes, of COURSE. And this is the final product.


    Check out those badass butterflies. I think it could be fuller, but she likes it the way it is *shrug* Want some tie-dyed paper for your own tree hugger? It just so happens that I tried a million different methods so you don't have to AND wrote a tutorial JUST. FOR. YOU. And you don't even have to make butterflies! Aren't I great? :D

    But a daisy, tie-dyed butterfly mobile alone does not a hippie room make. So I said to myself, "Self, what do hippies like?" Peace signs! Yes! What else? Beads! Anything else? Not war. I was kinda getting nowhere. I didn't want her room to just be a bunch of cheesy, store-bought stuff with peace signs printed on them because that's, well, cheesy. Plus the concept of a bunch of pre-fab stuff doesn't keep with my idea of hippies. But WHAT would a hippie room even look like?! So I turned to my most trusted resource -- Google images -- and prepared to assemble my inspiration. Turns out you have to be really specific when researching or you get a bunch of black light posters and more psychedelic results than what may be appropriate for your 14-year-old daughter. Once I got my search terms right (bohemian hippie rooms) I got this:


    Ok! I can do this! There's very much a Moroccan feel to this. In fact, Moroccan lamps were in SO many of the pictures and it just so happens that I own a few. Score! I also learned that a big part of "the look" is about a lot of textiles that don't match. Well, ain't that lucky! She HATES stuff that matches! I've made a list of things that I'll be incorporating into this "design." As I check each one off, I'll share with yous! Fingers crossed I'll have it all finished by the time they come back from their dad's...

    Next up: the ugliest curtains on the planet. She'll love them!

    Tie-dyed Paper


    I followed all sorts of tutorials and tried all sorts of methods I found online to make tie-dyed paper. I suppose they "worked," but none of them produced results that actually looked like tie dye. The fact is, paper just DOESN'T crease the way you need it to for traditional tie dying patterns. After trying everything else, I decided I was going to have to try an idea I'd discarded earlier: tissue paper. I was afraid it would be too fragile for what I was going for. Turns out, it's REALLY forgiving. I didn't have a single piece tear on me. Well then.

    If you wanna try it for yourself, you'll need:

    • Tissue paper (intact, cut to smaller pieces, torn into sort-of squares, whatev)
    • Permanent markers (you could use Sharpies, but mine were from the dollar store)
    • Rubbing alcohol
    • Pins/rubber bands
    • Something to protect your work surface
    • Spray bottle
    • Iron
    Ok, so the basic method is REALLY simple -- "shape" your tissue paper, color, spray with alcohol, wait to dry, unravel, iron. But you're going for an authentic pattern, right? So here's the easiest/most recognizable one. This was really hard to photograph, so bear with me!

    Step 1: Pinch your paper in the center


    Step 2: While holding the center, spin the outside edges counterclockwise (or clockwise, counter is just easier if you're holding with your right!)

    You'll do this with your paper still on the work surface. I only lifted mine for the photo!


    Step 2b: Continue spinning, making sure to keep the paper flat -- don't let it work it's way into a cylinder -- until you're left with a wadded up, spiral of paper. I won't lie. This is WAY easier with a shirt than paper. It took lots of practice to get it right, so don't get discouraged! Just unravel and start over with the same piece or just go with it! I doubt hippies were perfectionists ;)

    Wadded up, spiral of paper
    Step 3: Pin or rubber band at this point to keep the shape. You can use rubber bands to mark off your colors, too, just like with a shirt. I didn't have any rubber bands, though, and mine came out just fine :)


    Step 4: Color! Yay, fun! There are no rules for which colors you use. Just use at least two and color ALL sides of the spiral (you'll want your colors to match up on the front and back, though).


    Step 5: Spray both sides with rubbing alcohol. It just so happens that my sprayer thingie for my spray bottle fit on my bottle of alcohol. And I'm lazy. If yours doesn't fit, you'll have to do it the non-cool way and fill up your spray bottle.


    Step 6: Leave it the way it is, pinned or banded, to dry. This won't take long at all.

    Step 7: Carefully unwrap (it may still be a wee bit damp in the folds). Admire your ingenuity ;) This one, made specifically for the tutorial, came out the best. Natch :/

    Not ironed. Again, laziness.

    You'll want to iron it at this point (or maybe you don't. Who am I to say what you want to do?!) But IF you do, it's safe to do with a "cool" iron (what does that even mean?!). I ironed mine on, I think, the second setting on the iron. If you want, you can then cut it into a butterfly shape for your tree-huggin' kid. Or whatever. There are a bunch of actual patterns for tie dying clothing. I tried a few using tissue paper for The Girl's mobile and most of them came out exactly how I'd intended. I even attempted (and succeeded!!) the double spiral. So, go on wit' yo' bad self! And make some of your own. If you do, share them with me. I'd love to see what you come up with!

    Monday, July 22, 2013

    Summertiiiiiiiime and the livin's easy

    I know. I KNOW! I've been quiet. In my defense, the summer visitation schedule is broken up into four three-week blocks. So I've had the kids. But still, "What have you been doing?!" you ask. "It's not as if your kids are small and need you to follow them around!" you say with a roll of your eyes. This is true. They're not toddlers.

    So, first, we did this:


    Then we did this:


    Oh! We DID go on vacation where we did these things:
    Over and over and over again. We ARE actually pictured here.

    Sometimes it's best not to ask
    Escorting me on a stroll through the gardens

    Maze

    Creepiest kids EVER

    You have no idea the excitement pictured here.

    I did this. I can't even...

    Dead-on accuracy right here.

    There was a cow. She ran. For a cow. I can't make this stuff up.

    Pictured: Fail.

    This is the second time he's fought the British.

    Finding ghosts.

    Then we came home and did this:


    Then we stopped doing that -- VERY briefly -- to do this:
    What? There was a bug on the ceiling. That's my bug-killin gear.

    After careful review (gold, glittery powder?!), it might've been a fairy. Crap.

    So yeah, that's about it. BUT. BUT! While they're at their dad's house for the next three weeks, I'm going to FINALLY work on The Girl's room. You might've noticed from the picture of us gaming that there's not much going on in her room. We did hang curtains, but they're only temp curtains. And she put up One Direction posters. That's all about to change. Well, not the posters. She'd kill me. But I've kinda slacked on her room since she's not here full-time. The other rooms took priority. But I'm totally gonna decorate (and unpack that damn box she's left sitting on the desk for two months!!!) now so she truly has a room here.This means diy projects and tutes. I'll blog all about our vaca, too!
    Related Posts Plugin for WordPress, Blogger...